Unify your Windows/Mac setup through software for 💵 $0
Using a host machine (Windows) to control both Windows and Mac seamlessly

📊 The situation
I spend most of my time on my computer. Pretty much every minute I’m not sleeping I’ll be sitting (or standing if I’m feeling especially active that day) in front of my computer. I’m a software engineer, but I also love games, particularly PC games. So I have this cool PC that I’ve built, with a fancy ultra-wide 144hz monitor that I absolutely love.
My company also provides a really nice Macbook Pro that’s very powerful and all my work is done there. Great machine, really expensive. Since I already have such a nice PC setup, I pretty much refuse to work on the tiny laptop screen with its questionable keyboard and trackpad setup. Thankfully, smart engineers have figured out a great way to fix that issue: Keyboard, Video and Mouse switches, also known as KVMs.
😞 The problem with KVMs
I have several issues with KVMs:
They sit in front of your devices, often adding a tiny bit of input lag to each of them. I play games pretty competitively and I’m always looking to reduce latency as much as possible, so that’s a pretty big no-no for me.
They often (if not always) don’t support the high resolution/high refresh rate that my gaming monitor offers. If you’ve ever used 144Hz, you know you can’t go back to 60Hz, especially not voluntarily.
They get pretty darn expensive pretty darn fast. I’m all for spending money for high-quality products, but given the two caveats above, I simply can’t bring myself to splurge on one.
💾 The solution: software
As is often the case, most of these problems can be solved purely through software for the low low price of $0, which sits pretty well with me.
Note: You still need at the very least one display cable for each of your machines and a monitor that allows you to plug multiple inputs into it. As far as I can tell, that’s pretty much every single monitor nowadays, but still.
⌨️🖱️ Keyboard and Mouse using Barrier
You may be familiar with Synergy, which is a paid solution that allows you to use your keyboard and mouse on multiple computers seamlessly. What you may not know is that there is an open-source variant of it (originally forked from Synergy!) called Barrier that is entirely free. It may have a little fewer features than its paid counterpart, but as long as it allows me to use my mouse and keyboard on 2 different computers, I’m happy.
The good thing with this setup is that since your Windows machine is the host, you’re not going to get any added latency whatsoever. At worst, your Mac may get some when using your shared keyboard and mouse, but since it’s used purely for work, it shouldn’t make any visible difference.
Setup
Head to the Barrier installation page and install the software on both your Windows and Mac machine
Setup your Windows machine to be the server and your Mac machine to be the client
On Windows: Write down the IP address indicated next to IP addresses.
On Mac: Set the client to connect to the IP address indicated above. Write down the Screen name indicated.
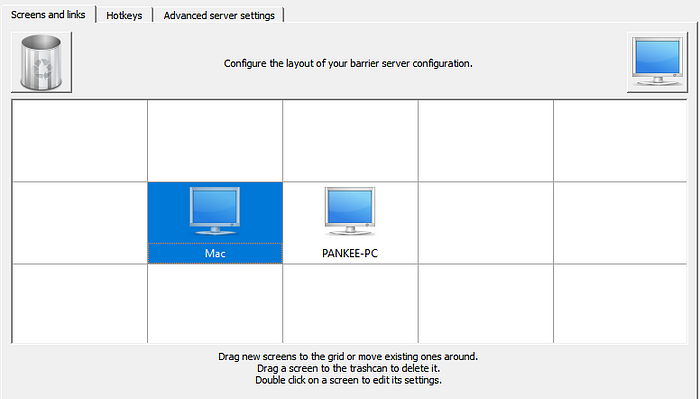
On Windows: Go to “Configure Server” and add a new monitor next to your main one (should be in the center). Double-click on it and enter the Screen name indicated on Mac. That tells the server to allow that specific client and place it wherever you placed it in relation to your main monitor. For example, if you place the Mac client to the left of your Windows one, moving the mouse to the left edge of your Windows screen will transfer mouse and keyboard to the Mac and vice-versa.
You should now be able to connect both machines. Start the server and try connecting from the client.
Depending on where you placed the Mac client, moving your mouse to that edge of the screen should move your mouse to the Mac client.
Caveats
Unfortunately, not everything is 100% perfect. For Barrier to work, you need two things:
- You need the server (Windows) to be running/not sleeping
- You need the client (Mac) to be running/not sleeping
One thing that you could do is have your Mac wake up/sleep on a set schedule. For example, you could have it wake up every day 15 minutes before you start work, that way it’s always ready to receive inputs.
🖥️ Monitor through dual input + ControlMyMonitor
First things first, what we want to do is plug in our monitor to both our Windows machine and our Mac machine. Depending on your setup, that might involve some HDMI to USB-C converter or some other nonsense that Apple kind of forces us to do. Thanks, Apple.
Once you have your monitor plugged into both your machines, you could quite simply just use your monitor buttons/UI to switch the input, but I’ve always found those settings to not only 1) be confusing 2) take forever. And if you’re going to be switching back and forth between the two machines multiple times a day like I am, you’re going to want a better solution.
Luckily, you can actually control your monitor’s input through software! That’s something that I discovered quite recently and that’s pretty amazing. This little piece of software called ControlMyMonitor does just that and it has a nifty little UI + it responds to parameters, which is very convenient as we’ll see later.
Setup
Download ControlMyMonitor. We don’t even need to install anything! My favorite kind of software.
Start it and it will try to read all the different settings that it can send to your monitor. The one we’re interested in is Input Select (In my case, that’s 60):

Double-click on it and try changing it for one of the values that you see listed on the right.
Keep changing it until you land on your Mac. Write it down.
Amazing. Now we know we can change our monitor input purely through software. The next thing we should do is write a little script that will do that just for us, that way we just have to run the script and it’ll allow us to toggle between the two inputs without needing to lift a finger 🙂
Create a new .bat file somewhere that’s easily accessible and enter the following script:
"{CONTROL_MY_MONITOR_PATH}" /SetValue "{MONITOR_NAME}" {INPUT_SELECT_ID} {MAC_MONITOR_VALUE}
Here are the values you should replace:
CONTROL_MY_MONITOR_PATH: Path of the executable for ControlMyMonitor.exe. It could be something like “C:\Users\MyUser\Downloads\ControlMyMonitor.exe”. Don’t forget the “” around the whole path.
MONITOR_NAME: This is the name of the monitor you see at the very top of the ControlMyMonitor window. Don’t forget the “” around the name.

(In my case, that’s “\\.\DISPLAY1\Monitor0”)
INPUT_SELECT_ID: That’s the ID you see on the very left of the ControlMyMonitor window for the Input Select row. In my case, that was 60 (see screenshot above)
MAC_MONITOR_VALUE: That’s the value you wrote down a couple of steps above when you were looking for the right setting to change it to.
Here’s what mine looks like for example:
"D:\Tools\ControlMyMonitor.exe" /SetValue "\\.\DISPLAY1\Monitor0" 60 17
Save the file and try running it. If you did everything right, your input should have switched to the Mac! You can now create a similar file to switch to Windows and use a tool to be able to run scripts from keyboard shortcuts :)
Bonus - Use a Stream Deck for easier control
One of my favorite productivity tools is an Elgato Stream Deck. As the name implies, it was originally built with streamers in mind and allows for easy switching between OBS scenes and other streaming-related tools. It’s also extremely customizable, and it can help us with our little scenario 🙂
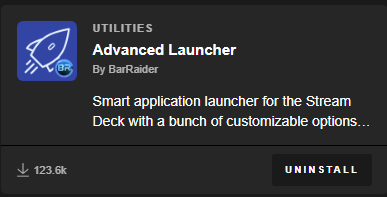
The plugin called Advanced Launcher by BarRaider allows us to run executables with support for arguments just by pressing a button on our Stream Deck. See where I’m going with this?
The way I have mine set up is as follows:
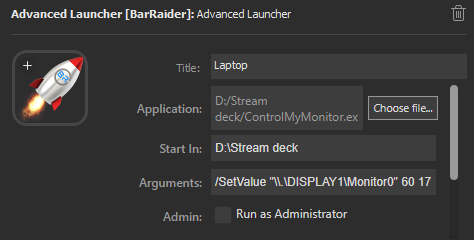
As you can see, we’re basically doing the same thing we were doing with the script earlier, except we’re specifying where to find the ControlMyMonitor.exe executable and then passing the arguments to tell it what to switch to.
That pretty much covers it! At this point, you should be able to seamlessly switch your mouse and keyboard from one computer to the next and have an easy way to switch inputs on your monitor without pressing a bunch of buttons on your monitor.